As a kid, I’ve always liked to play dress up, but my favorite thing to do was braiding my hair and pinning flowers into it. It seems that braids have never gone out of style, and now more than ever, hundreds of talented girls are willing to share their braiding tutorials. Lets take a look at some simple tutorials you can try even if you’ve never braided before in your life. The hair tutorials are listed in a random order. Enjoy!
-
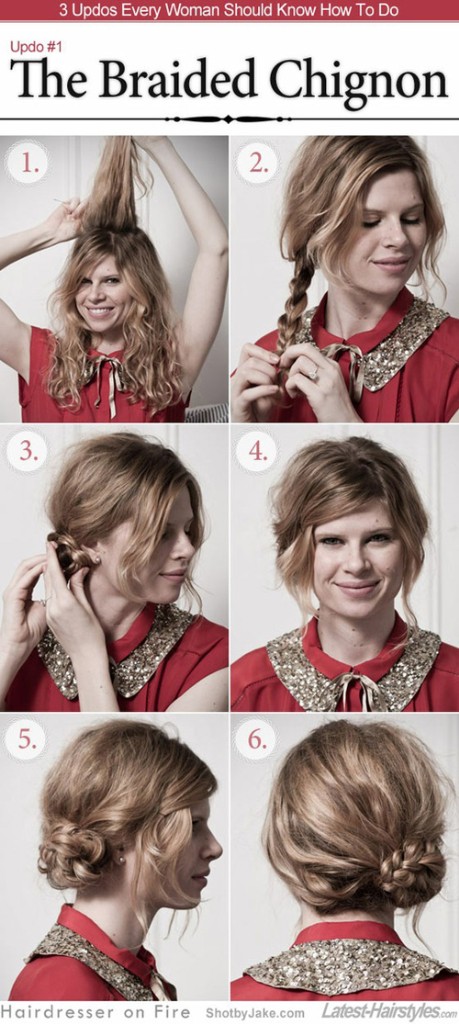
The Braided Chignon
This one is super easy and it looks very classy as well. Comb your hair, and start braiding a basic braid at the back of your head. You have to bend it a little to the right or left. When you are done with the tail, curl it around itself in order to make a small bun. Use a bobby pin to arrange your excess hair. You can put the rest of your hair in a messy pony tail.
-
The Braided Bun
This hair style is very playful and it looks very fresh. Comb the top of your hair and arrange it in a pony tail. Separate the tail in three sides and braid them. Pull the hair to make it looks loose. Gradually curl up each tail around the pony tail and secure them with bobby pins. Use some hair spray for strength.
-
The Fishtail
The Fishtail hairstyle is boho chic perfection. It looks like a sophisticated hair-do although it is actually very simple to do. For a smoother braid, brush your hair out first. For a messier braid you can separate the hair with your fingers. Create a pony tail on the side with a clear elastic and split it into two separate pieces. The trick is to take a piece from one side and pass it to the other side. Alternatively take a piece from the opposite side and pass it back to the first side. Braid until you’re done and cut the elastic.
Video Tutorial: Fishtail Tutorial
-
Heart Braid
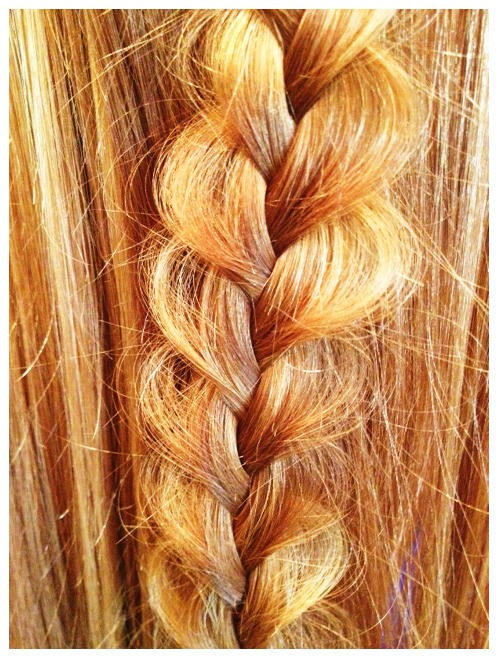
Take the part of hair that you want to put the heart in and start to make a regular braid down. After you are done with it, hold it tightly on the end and start pulling little pieces of the sections until you obtain little hearts. The braid will start to look really flat. When you are done you can pin it to the rest of your hair. Simple and beautiful!
-
Waterfall Braid Tutorial
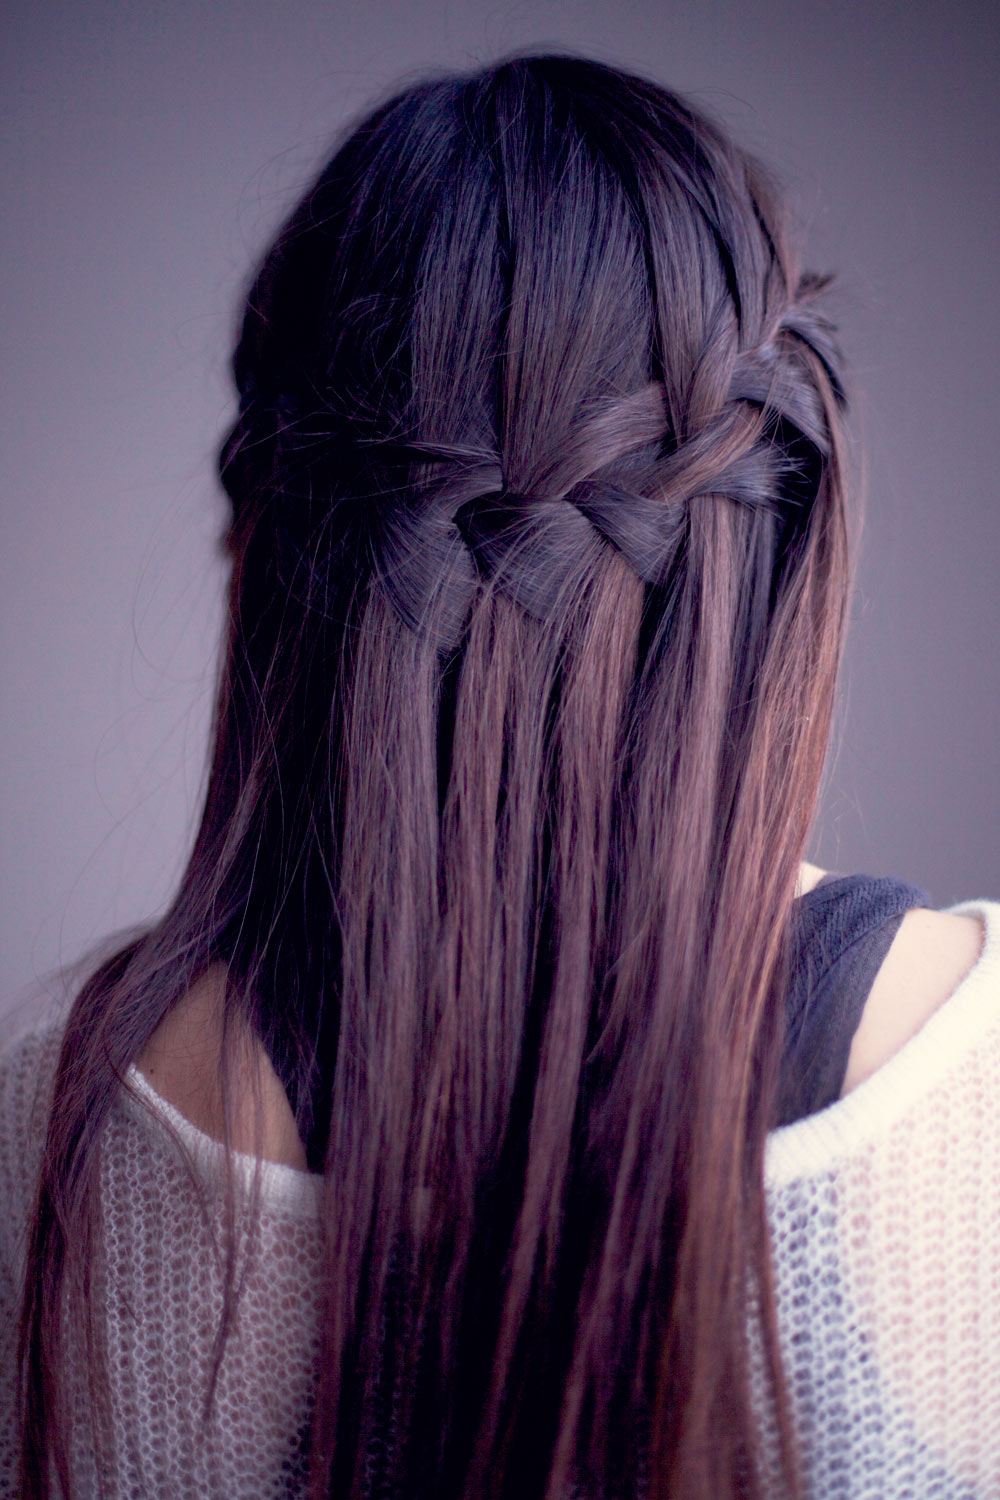
The waterfall braid is a loose hair-do in which you braid your hair but you let pieces of it hang in a „waterfall” style. All you need to do is to know the classic braid technique and to practice a lot o times. Part your head on two sides, and take a little section from the front of your hair. Start french braiding at first and when you get to the point where you want your waterfall to start put the last loose piece in your mouth, and pick up another new piece with which to continue. Proceed with the french braid, and every time you finish a section separate the used section and add a new one. Finish everything with a classic braid.
Video tutorial: Waterfall Braid
-
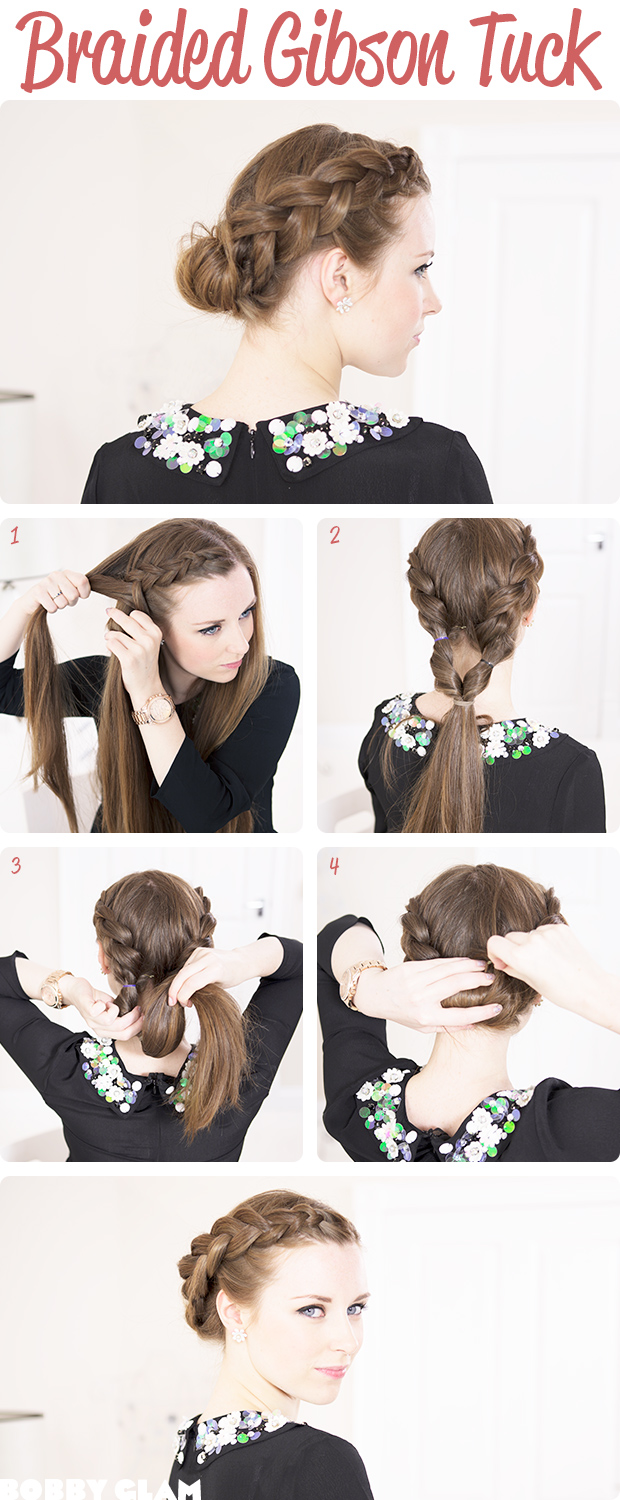
Braided Gibson Tuck
This is the kind of hair style that would look great at a special event but it is also great for school or work. It is very easy to do. Split your hair down the middle, and make two sections. Pick up a small part at the top of one of the sides, and split it in three. Take the middle section over the left section, and then the middle section over the right section. Pick up pieces of hair as you go, and go with the braid. Always take the middle strain out. Braid until you reach the back of your head, and then start braiding the other side the same way. Now join your two back sections together and tie them into a pony tail. Pull it back a bit to make a gap and push the pony tail through it to make a loop, and repeat the movement until you are out of hair. You can also push only a few times if you are looking for a messy look. Secure the bun with bobby pins.
-
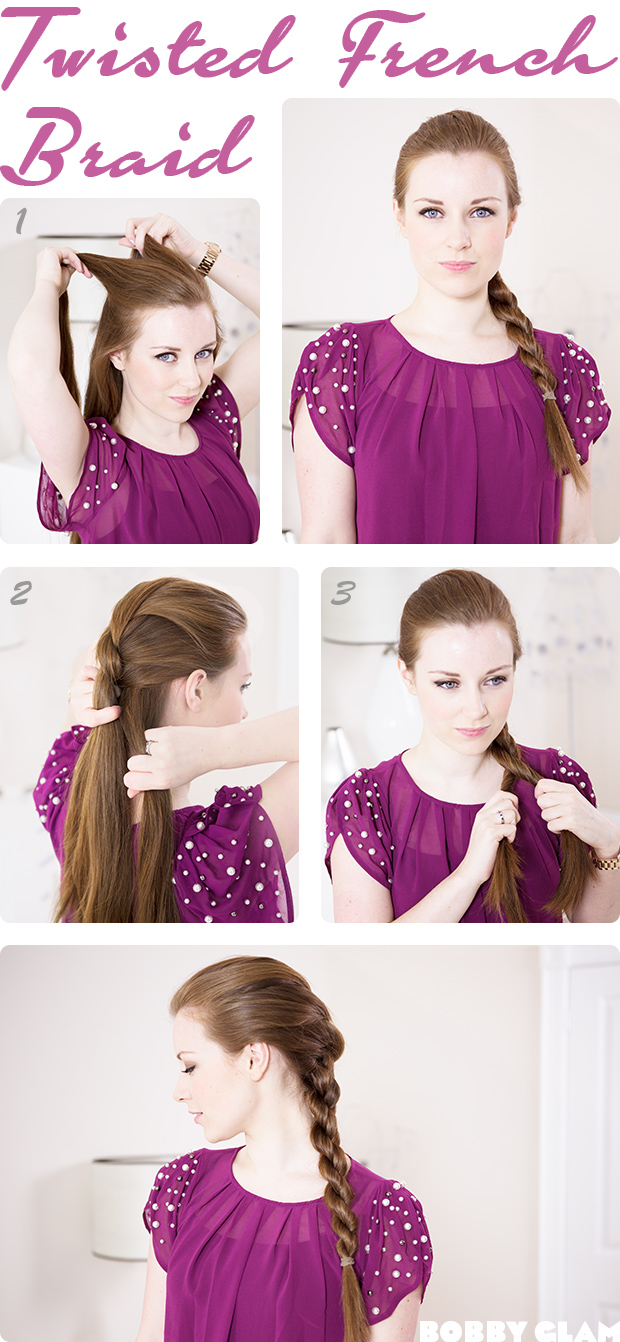
Twisted French Braid
The twisted french braid is a slightly different version on the classical french braid which can be incorporated in many hairstyles. Put all the hair to the back, and smooth it over. Start from the front and take it back. Split it into two section and to start of twist one section over the other. Pick up hair from the sides and add them to the back. Alternate sides and once you’ve pulled them back, twist them over. Repeat the steps as many times as you want. Before you finish the hair-do twist each side on itself a few times and then twist them around each other. Keep going like this all the way down and secure the tail with an elastic. You should check out more braid tutorials if you are out of ideas!
-
The Five-Strand Braid
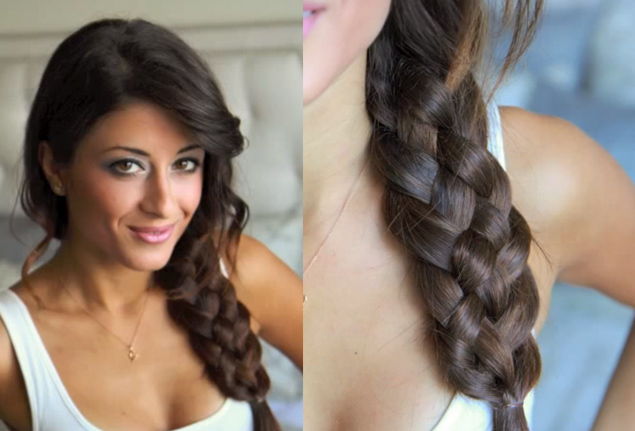
You will definitely need hours of practice for this type of braid, but it is worth it. It looks beautiful, it is classy and it works for special occasions. It is a little complicated to explain, so we will be showing you a very easy tutorial. You will learn how to do it on your own time in no time.
Video tutorial: Five-Strand Braid
-
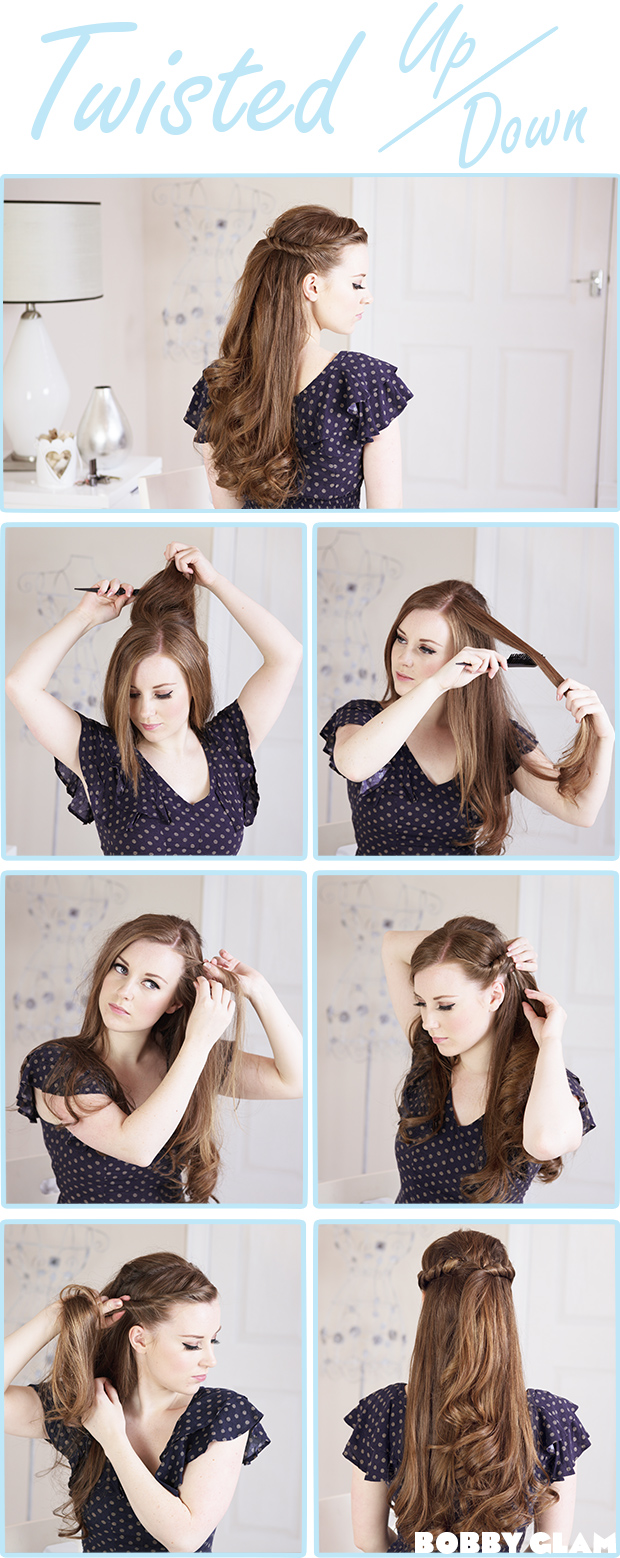
The Twisted Up and Down
This look is very feminine, perfect for the spring, a romantic walk or a casual party. First of all you should curl your hair first because it will look better in the end. Use your fingers to pick up some hair on the back, and with the comb try to give more volume to the hair. Give volume to your sides as well, but try not to make it look messy. Take hair from one side and start twisting it around itself while adding hair. When you reach the back pin it with some bobby pins. Repeat on the other side, and let the rest of the hair loose.
-
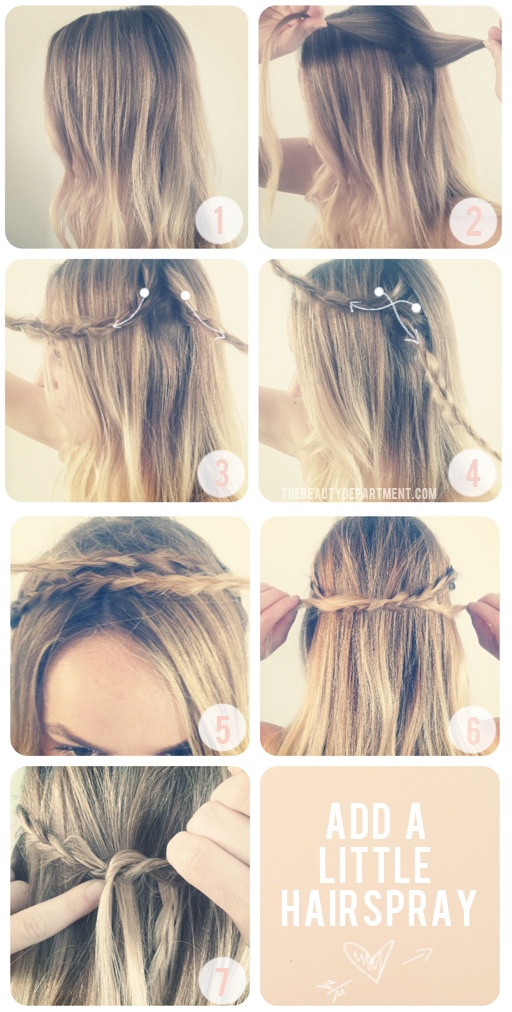
The Hairband Braid
This tutorial is supper simple. Start by separating the sides of your hair, and choose to 1 to 2 inch sections of hair on the back. Start braiding them in a normal way, cross them one over the other at the roots and take them around the head. Go back, make a „Knot” with your hair and you are done. This is a hippie look which will keep the hair out of your eyes, but it is also really cute.



Leave a Reply