There are a lot of great handmade jewelry tutorials. The most intricate models are without a doubt those of beaded jewelry. We have searched the internet far and wide and found 10 awesome, yet simple patterns and tutorials for beaded jewelry.
No products found.
Here they are:
-
Rainbow of Flowers Charm Bracelet
Start by choosing your beads in rainbow colors, with different shapes like leaves, flowers or hearts and pick out a nice looking chain to create a simple yet beautiful charm bracelet.
How to make it:

Arrange the beads in the order that you like. We advise you to arrange them so that you have an interesting mixture of colors.
-
Prepare the links with which will be used to support the beads on the chain. Start from the left and add chains and beads as you go. Make sure that your bracelet is no more than 17 cm long, or better yet, measure the chain on your own hand.
-
For a beautiful looking pattern skip some links of the chain, and arrange the colored beads evenly.
-
You can also add metal accessories, the same color as the chain, to highlight it. You can also add more beads on the same link, either by using metal needles which you then curl into a circle that will be attached to the bracelet, or by using small round links.
-
Elise Earrings
 The next tutorial is inspired from a pair of earrings worn by Angelina Jolie in „The Tourist” . It is actually very simple to make them, as long as you follow these easy steps. It is the perfect tutorial for a beginner. You will need bicone crystals or semi precious rounds to highlight the earrings, and small seed beads.
-
Prepare your utensils. Add 1,5 meters of thread wire to your needle. Pick up 1 accent bead, 3 seed beads, 1 accent bead, 1 seed bead, 1 accent bead, 3 seed beads, 1 accent bead, 1 seed bead, and leave an 8 inch tail. In the end go back with your thread through all the beads, and tie a knot.

-
Put your thread through the first accent bead and the first three seed beads. Continue by adding 13 seed beads and go back through the first 3 seed beads and the next 8 seed beads.
-
Redo step one by adding 1 accent bead, 1 seed bead, 1 accent bead, 3 seed beads, 1 accent bead, 1 seed bead and finally 1 accent bead. Go back through the last seed beads.
-
Go back through all the beads added previously, tie a know and make a knot. Don’t forget to trim the tail.
-
Finish by opening the loop of the ear-wire, and attach the earring over a set of 3 seed beads. Close the loop, make sure that everything is nice and tight.
You can find the full tutorial here.
No products found.
-
Dream-catcher Earrings
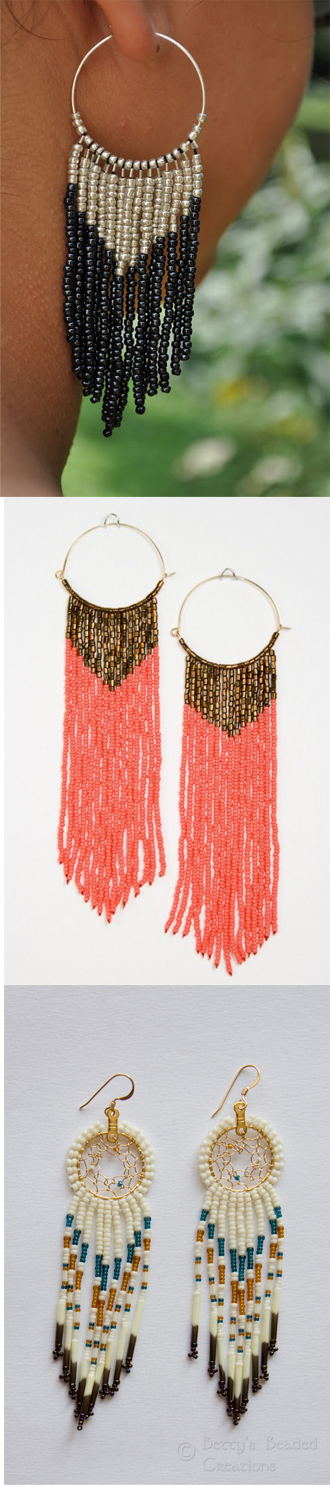
These beautiful earrings are actually easy to make, and they can look good on anyone as long as you choose the right colors. This beaded jewelry tutorial is recommended for beginners.
What you need: 2 earring hoops, seed beads of different colors, silver crimp beads to secure the beads, strings, a needle, pliers and scissors.
-
You can start by sliding a few beads on the earring hoop.
Before putting the needle on the string, insert one bead on the string, fold the string in half and put it through the needle. It is your choice how many beads you want to put on the string, depending on how long you want the earrings to be. We recommend that you use two colors, one for the upper part of the earring, and one for the lower part. After you insert as many seed beads as you like, put a crimp bead and flatten it with your pliers.
-
The longest string of beads should be the one in the middle. Repeat the process but add less beads with each string.
-
Once all the strands are complete, press the crimp heads again to secure the threads, add the same amount of beads on the earring hoop at the end, and you are done!
You can find the full tutorial here.
-
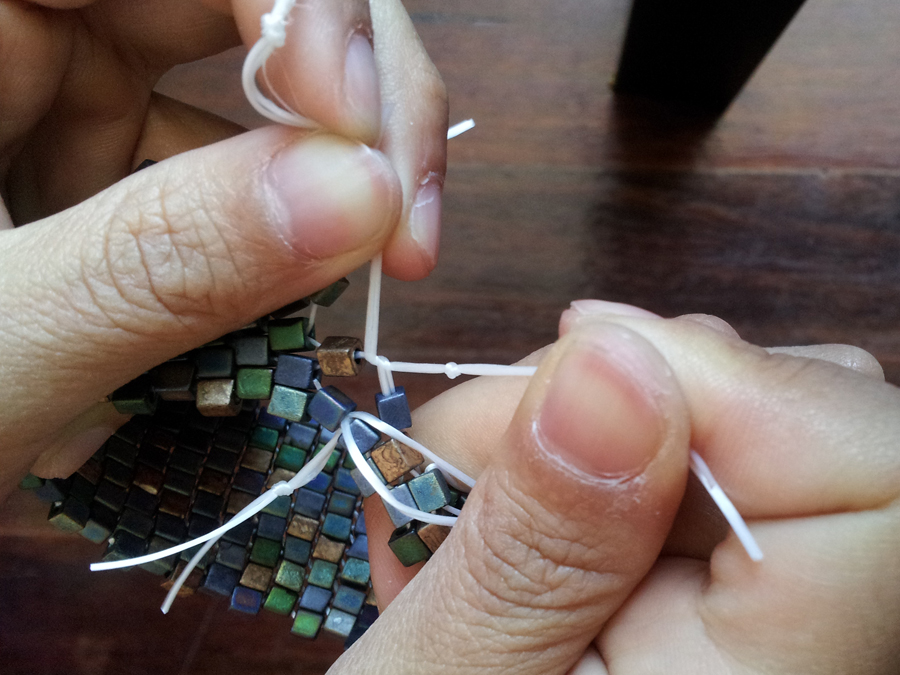
Beaded Stretch Cuff Bracelet
Miyuki beads are probably the best beads on the market. Why? They are the most precisely cut beads, which means that patterns will be more exact. They are produced in Japan and they are exactly what people who like to make beaded jewelry need. For this bracelet you will require beads ( they can be circular, cubed or oval ), stretch beading thread and a glue for securing knots

-
-
Start by measuring your hand size, then cut the stretch thread into pieces, longer than your hand size. Cut out as many strings as you want, depending on how wide you want the bracelet to be.
-
Knot the strands into twos.

-
-
Start inserting the beads on the strands, make sure that each bead ( except the ones on the exterior ) have two strands going through them. The strands have to form V’s, and they will follow a certain trajectory in order to secure the beads. This way you will obtain a weaved effect and keep the beads in a mat-like pattern.
-
Every time you finish a column tighten the beads together. Before you are done make sure that each bead in the last column has at least 2 strands

going through them ( even the ones on the exterior ).
-
Tie the strands on each side together to finish the bracelet. Cut off the excesses to ensure a nice and clean look.
You can find the full tutorial here.


-
Beaded Dainty Feminine Bracelet
This tutorial might seem a little difficult, but it is actually quite simple. It can be done with any kind of beads, in any types of combinations. Let’s start with the materials. You will need at least 2 meters of thread, 10 repeating units of bracelet, size 15 beads, size 6 beads, and size 11 beads.
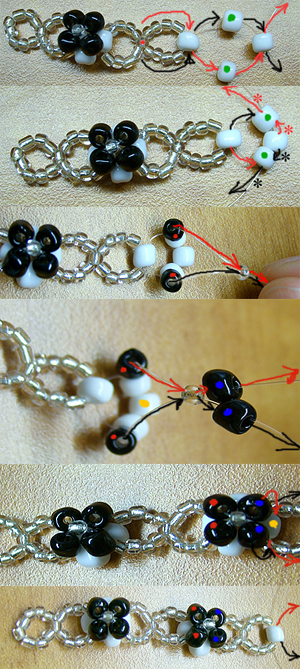
This pattern is extremely simple as long as you understand the basic concept, because every unit repeats itself.. The easiest part of this pattern is that you never have to go back, because every bead is newly added.
-
OK, so start by adding four seed beads at each end of the string, and cross them through one larger bead. Add 1 large bead on each string, and cross them through a fourth large bead.
-
Add two large beads of a different color, one on each string, and then string both ends through a seed bead. Repeat the process by adding 1 large bead on each string.
-
Take the two open ends of the string and insert them through the white bead ( it is marked with yellow ).
-
Repeat the steps above until you have completed the bracelet. Keep going until it is long enough. Close the bracelet, and you’re done!
You can find the full tutorial here.
-
Beaded Snowflake Tutorial


I’ve always been fascinated by this beaded jewelry pattern, and I am very happy that I can finally share it with you. It can be done by a beginner. All you need is: 2 meters of size 00 thread, and 143 size 11/0 beads in two colors. We recommend that you use larger seeds as highlighters.

– For this beading tutorial the best advice we can give you is to follow the instructions on the diagram.
– After you’ve finished weaving, take your thread back through the snowflake, in a random order, to secure it. – Tie off the thread and burn the ends.

-
Colorful Safety-Pin Bracelet

I love this bracelet idea. It’s very simple, yet beautiful. For it you will need a lot of seed beads, safety pins, and elastic. Now the instructions:
-
Start by adding seed beads on the safety pins, whichever way you like. You can use more colors on the same safety pin, or the same color on one safety pin.
-
Arrange the safety pins, with each end on one of the two elastic threads. Make sure to arrange each safety pin correctly, as explained in the picture.
-
Measure your hand, and after you’re done adding the beads, tie two knots and burn the ends.
-
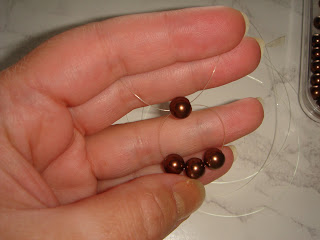
Cross bead weaving
This is a simple tutorial, that you can use for earrings, bracelets and necklaces. You need 0.25 mm wire, 0.2mm seed beads, and small pearls.
-
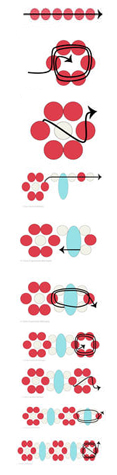
Start with the pearls, Put 3 pearls on the wire, and then insert both ends of the wire through the fourth pearl.
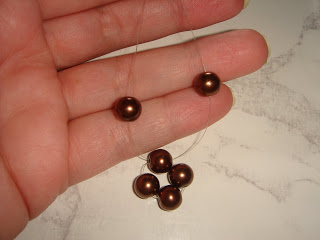
-
Continue by adding one pearl on each string end, then cross them again through one pearl. Repeat the process until you are satisfied with the length.
-
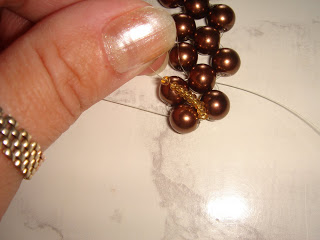
Continue by adding 10 seed beads on teach string,, and insert them through the middle pearl.
-
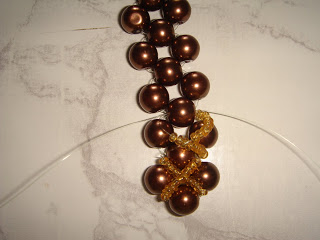
If you want to make the bracelet in the image, you can finish each end with 10 seed beads on each end, which go through one pearl.
-
Secure the ends, and add the clasp.

-
-
Twin Bead Daisy Chain
-
You are probably familiar with the daisy chain. They are little narrow bands of bead-work with beads arranged in the shape of flowers. We will tell you how much material you need for an inch of bead-work: 18 size 11/0 seed beads, 15 size 15/0 seed beads and 3 twin beads.
-
Put the string on the needle and start adding six size 11/0 beads, and be sure to leave six inches from the end of the thread.
-
Hold the threads between your fingers and insert the needle through the six beads again.. Bring the needle out through the first bead.
-
Use one 15/0 bead and pass the needle through it in on a diagonal trajectory, insert the string through the sixth bead.
-
Continue with the following beads: one 15/0, one twin, one 15/0, one 11/0 and one 15/0. While holding the beads between your fingers, reverse the order and direction, and go back.
-
Pass through all the beads in the connector segment, and bring your needle out through the 11/0 beads on the other segment. You are done with your first daisy.
-
Repeat all the steps for the following daisies.
-
For more details check out the complete tutorial : Daisy chain.

-
Peyote Beaded Ring
This is not such an easy tutorial, for beginners. The Peyote stitch is a versatile bead-weaving technique with which you can create wonderful beaded jewelry. You will need 1 pack of 3 colors of 11/0 seed beads, 1 meter of beading thread, beading thread, a ruler and a mandrel.
-
Cut the thread, pick an extra thread and use it to secure the line. Remember to save 7 inches for the end of the string. ( this bead is called a stopper ).
-
Insert 2 orange, 2 blue, 2 white, 2 orange and 1 blue seed bead. Pick up the second beading needle and insert it through the beads as shown in the image.

-
Pick up a white bead, skip the orange down bead and pass the needle through the next white up bead. Pull the thread and do the same with the next blue and orange beads.
-
The pattern begins to take form, complete the third row and create an up bead, pass the needle back through the orange down bead as shown in the picture.
-
This is becoming a little complicated for me, but the images should be sufficient explanation.
-
After you’ve reached the desired length and the bead-work fits the finger, „zip up” the bead-work to form a circle or ring. Fold the bead-work, and make the ends meet. Insert the needle through the first bead from the left side and weave in zit-zag direction. Pull the thread and measure the ring on a mandrel. Skittle the threads and you are done.
-
For more details check the complete tutorial: Peyote Beaded Ring
No products found.
Calling all jewelry enthusiasts – learn how to make money selling bead jewelry!
Leave a Reply