Handmade jewelry is becoming more and more popular, for various reasons. The main reason is that people want something that is unique, one of a kind. Secondly, handmade jewelry is cheaper than the one you would find in shops. And thirdly, it feels very nice to know that you’ve made something with your own hands. Today we will be showing you 10 great handmade ideas, for jewelry, and decorations.
- Monster Toy
A lot of shops are selling decorations in the form of toys stuffed with wadding. However, they are very expensive, so we will show you how to make your own. You will need a piece of material, waterproof marker, stuffing from old pillows, and a different type of material for the eyes. Start by cutting the fabric, and then drawing the model on the back. You can draw whatever you like. Anyway, cut out the shape, and then make an exact same shape, only in the mirror. After that you stitch the two pieces and you sew them together. You should leave however a small whole for the wadding. The eyes and the accessories are completely up to you. Glue them with universal glue, fill the little monster wit wadding, sew the opening and you are done!

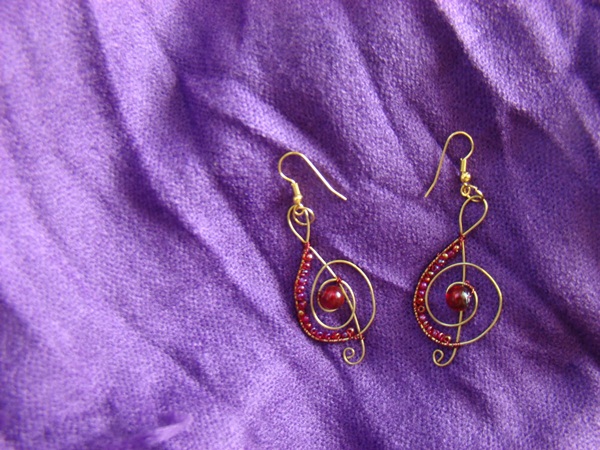
- Wire earrings in the shape of Key Sol
Start by choosing your materials, and two beads that you find interesting. Start to bend the modelling wire by fixating it on the tip of the circular patent. Hold the wire in the patent and twist it delicately in a semi-loop. Do the exact same thing with the other part of the wire. The piece of wire will now look like a Sol Key. All you have to do now, is to put a little color on your jewelry. You have to make some sort of a hook for the beads, and this means you have to put a needle through it, which you then curl into a loop.
Here are more tutorials about wire earrings and jewelry : Wire tutorial.
- „Cluster” Earrings
You will need: small needles, beads, bead caps, links, pliers, and flat pliers. You should start by making the beads for the grape. The process is fairly simple: you insert a small needle through the bead, then curl the tip into a small loop. Repeat this process with all the beads. ( a good looking cluster earring is usually made out of 13 beads ). After you’re done, attach a number of links together, and then attach the beads on them. You can make the earnings as long as you want.

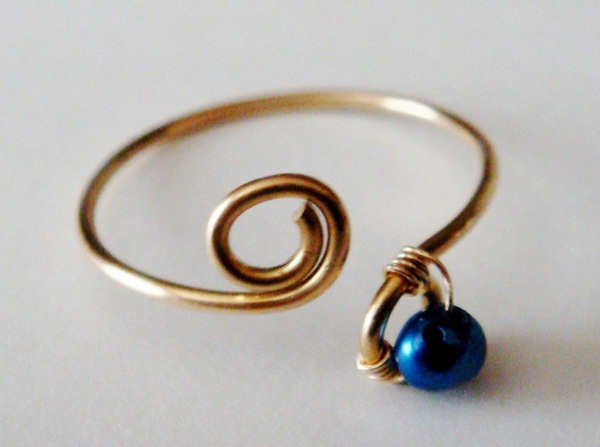
- Wire ring
For this you will require a lot of patience, 0,4 mm modelling wire ( 1,5 meters ), 1 mm wire ( 0,3 meters ), pliers and semiprecious stones or beads. Start by cutting the 1 mm wire in two equal part which you place parallel to each other. From the middle you have to wrap the 0,4 mm wire. It is best to wrap it 3 times on one thick wire, and then proceed to the other one. From here on, a lot of things can happen. You can keep the two pieces of thick wire parallel, or you can widen them a bit. It is completely up to you. Stop wrapping when you have 1,5 cm remaining on each side of the 1 mm wires. Curl the ring on a round marker, or mandrel, curl the wires to the exterior, until you create a spiral, and start making your own model. You can attach beads wherever you want, with modelling wire, and make your ring look different.
Here is a great wire ring tutorial!
- Chandelier earrings
Chandelier earrings are perfect for the summer days, you can wear them anywhere you want, with everything you want, and still look classy. Chandelier Earrings are usually done with the help of a „chandelier” from which you hang your beads. However, there is another way to make them with links, and semiprecious stones. Put seven links on a single link, to form the base of the chandelier. Use 6 links for the second row, which you connect with two neighboring links. For the last row, use 5 links with semiprecious stones on them.

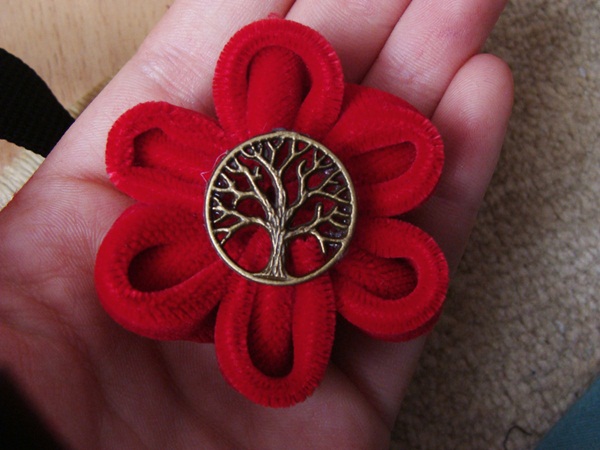
- Hand-made velvet brooch
For this you require: velvet, scissors, some thread ( we recommend you use the same color thread as the velvet ), a piece of cardboard and superglue. Start by cutting out a circle, from the cardboard and make it the size of the flower. Place the circle on the material, and with a pen or marker draw the outline of the circle. Cut six other circles, the same size. Take one of the circles, fold it in half, and then fold it again to create „wings”. You have your first petal! Use the thread and needle to sew the petals together make a knot and arrange them. Before you finish you can add a small medallion to make it look better.
- Hand-made vane
You don’t have to put a lot of effort or spend a lot of time on this kind of decoration. We advise you to use colored paper, because in the end, the vane will look better. You can also print something on the paper. Start by cutting your paper in squares ( the size is up to you ). Divide the square in four equal triangles and fold them again. Fold the edges of the squares towards the center, and then secure the four shapes with the help of a pin.

- 3D Greeting Cards
Whether its Valentine’s Day, Christmas or Easter a handmade greeting will make a better gift than anything you can buy in a store. If you don’t have money to spend on an expensive gift, you can always make something, in a few minutes. In order to make this card you only two pieces of contrasting paper, glue, scissors and a liner. Start by cutting out some shapes (whatever you want), hold the two pieces of paper and cut out strips of paper. Don’t cut them out completely, you will use them for the 3D effect. At the end, glue the shapes that you cut out on the other piece of paper as you see fit. You can also add a message, pieces of ribbon or velvet.

- Handmade Bow tie
One of the most popular accessories for men in the last few years is the bow tie. The good news is that you don’t have to buy it. Bow ties look great on guys, and they can make an outfit look completely different. If you want to make your own bow tie you should know that it’s not that hard to do it. The most important thing is to choose the right material. You will require a little glue, a safety pin for a brooch, a lock with ribbon for the bow tie and the material. Cut a square rectangle ( 15×10 cm ) and another small strip ( 3×5 cm ). Fold the big rectangle in two, and sew the „free” sides, but leave 2 cm not sewn so that you can turn it inside out. Fold the material on both directions to find its middle, and start making your bow tie. After your done with this piece, turn your attention to the the small piece of material. Sew it on the middle of the bow tie and make sure it doesn’t look unfinished. Use a needle to sew the safety pin on the back and you are done.

Here is a great bow tie tutorial!
- Fimo Rose
Fimo is the perfect material for people who are always looking for something different and fresh. It is very flexible, and it will enable you to create whatever you want, as long as you let your imagination run wild. If you are a beginner, you should be happy to know that the fimo rose is the easiest thing to make. You will need Fimo, a round shape ( the tip of a brush for example ), a paste machine and a fimo spatula. Start by dipping the material in liquid, then with the help of the paste machine, make a flat shape and draw out circles with the round shape. Make a cilinder from fimo, and put every circle on it, in order to change their shape. In the end, put the 8 petals together, and there you have it! Your first Fimo Rose.

For more handmade ideas, be sure to visit the post about Make it your own Sweatshirts!
Hi, what if I don’t have any talent, where should I start? Thanks!
I guess you should just buy some from a store or the internet! haha
Hi guys and thanks for your comments! Arlie, even if you are not talented you can watch some tutorials and get some inspiration…just try and you will succeed. Just like in real life, you can’t make it without hard work. 🙂
Every weekend i used to pay a visit this site, for the reason that i want enjoyment, for the reason that this this website conations really good funny information too.